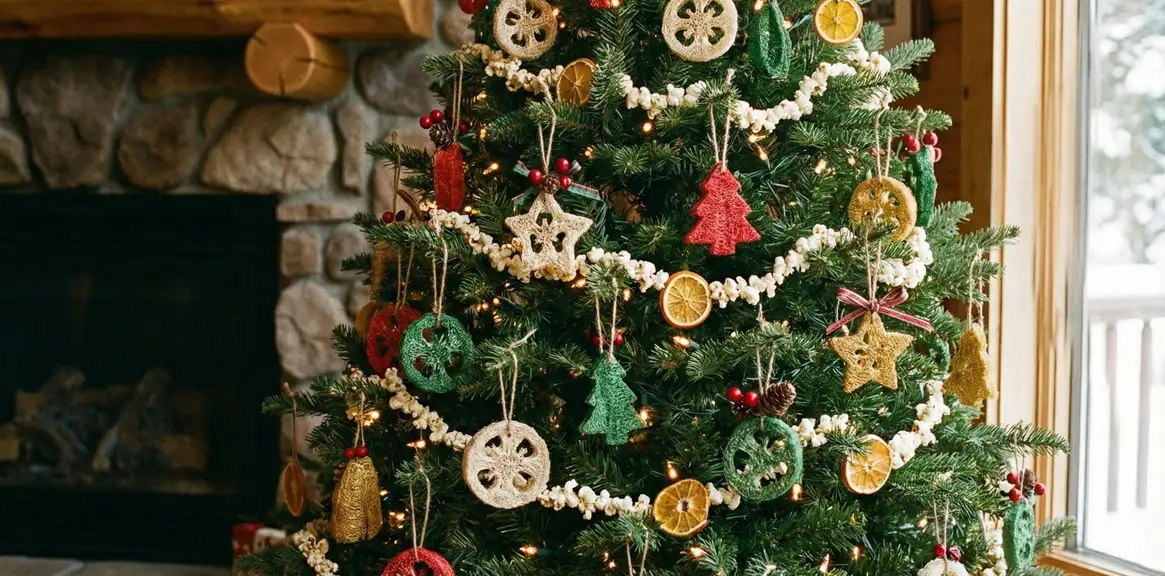
Transform your holiday season with beautiful, sustainable Christmas ornaments made from natural loofah sponges. These eco-friendly decorations combine rustic charm with creative possibilities, allowing you to craft unique pieces that reflect your personal style while reducing environmental impact. This is a wonderful addition to any loofah craft collection.
Loofah's fibrous texture and lightweight nature make it an ideal material for DIY Christmas ornaments. Whether you're looking to create delicate snowflakes, elegant angels, sparkling stars, or festive wreaths, dried loofah provides the perfect canvas for your holiday creativity. These ornaments also make excellent handmade holiday gifts for friends and family.
Why Choose Loofah for DIY Christmas Decorations
Natural loofah sponges offer several advantages over traditional ornament materials. They're lightweight, making them safe for delicate tree branches, and their unique texture creates visual interest that's impossible to replicate with synthetic materials. The porous structure readily absorbs paint and holds embellishments securely.
Recommended Craft Supplies

PIUH Complete Goat Milk Soap Making Kit
All-in-one soap making kit with goat milk base, molds, dried flowers, and essential tools. Ideal starter kit for beginners wanting to create loofah soap bars.
Check Price on Amazon
Rolio Mica Powder Colorants for Soap Making
Vibrant, skin-safe mica powder set for coloring handmade soaps. Create beautiful swirls and layers in your loofah soap bars with these cosmetic-grade pigments.
Check Price on AmazonAs an Amazon Associate, we earn from qualifying purchases.
- 100% natural: Biodegradable plant material
- Renewable resource: You can grow loofah at home
- No harmful chemicals: Natural fibers without plastics
- Lightweight: Reduces shipping environmental impact
- Compostable: At end of ornament's life
- Unique texture: Handmade alternatives to mass-produced decorations
Essential Supplies for Making Loofah Ornaments
Before starting your loofah Christmas ornament project, gather these essential materials. Having everything prepared in advance makes the crafting process smoother. You'll want to start by preparing loofah for crafts if using homegrown material.

Basic Materials Needed
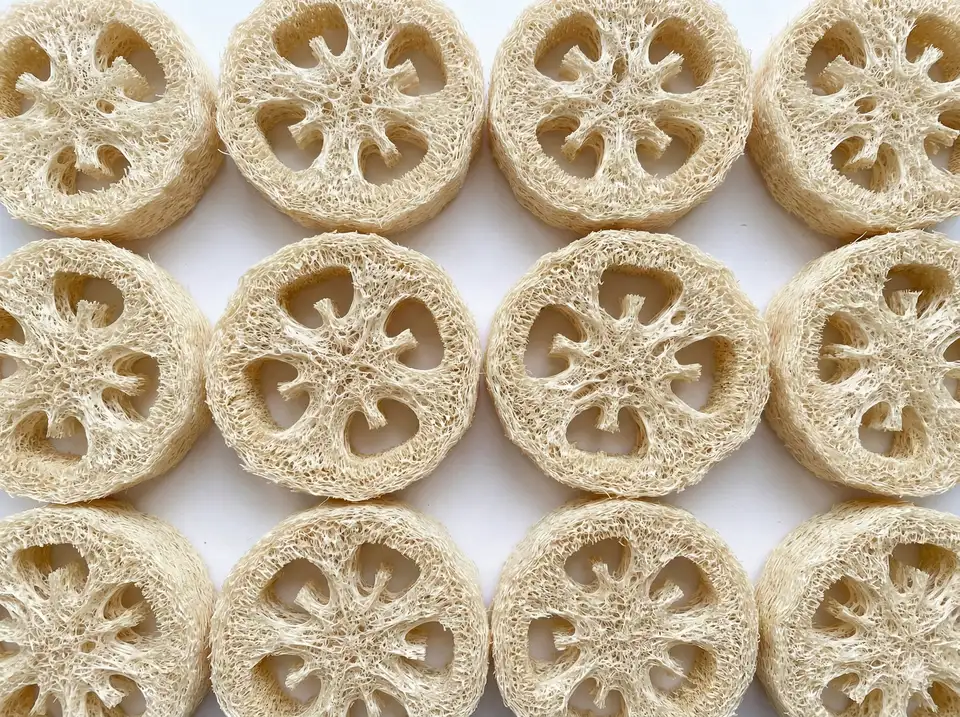
- Dried loofah sponges: Choose clean, fully dried loofahs in various sizes
- Sharp scissors or craft knife: Essential for cutting precise shapes
- Acrylic paints: White, red, green, gold, and silver are classic holiday colors
- Paintbrushes: Various sizes for detail work and base coating
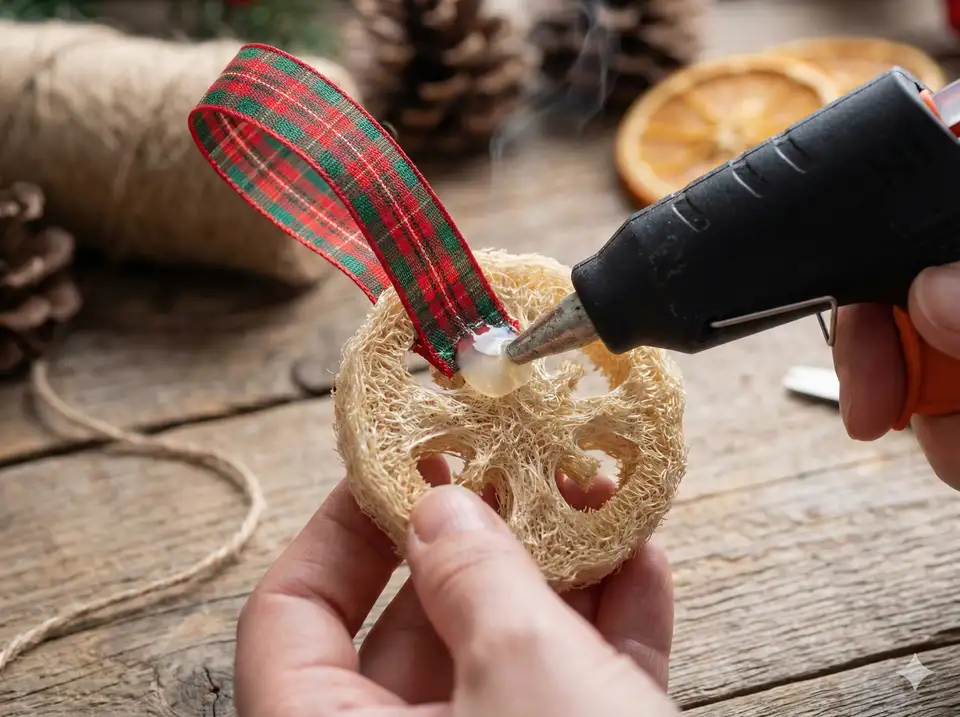
- Ribbon or twine: For creating hanging loops
- Hot glue gun and glue sticks: Secures embellishments and reinforces structure
- Clear acrylic sealer: Protects finished ornaments
Decorative Embellishments
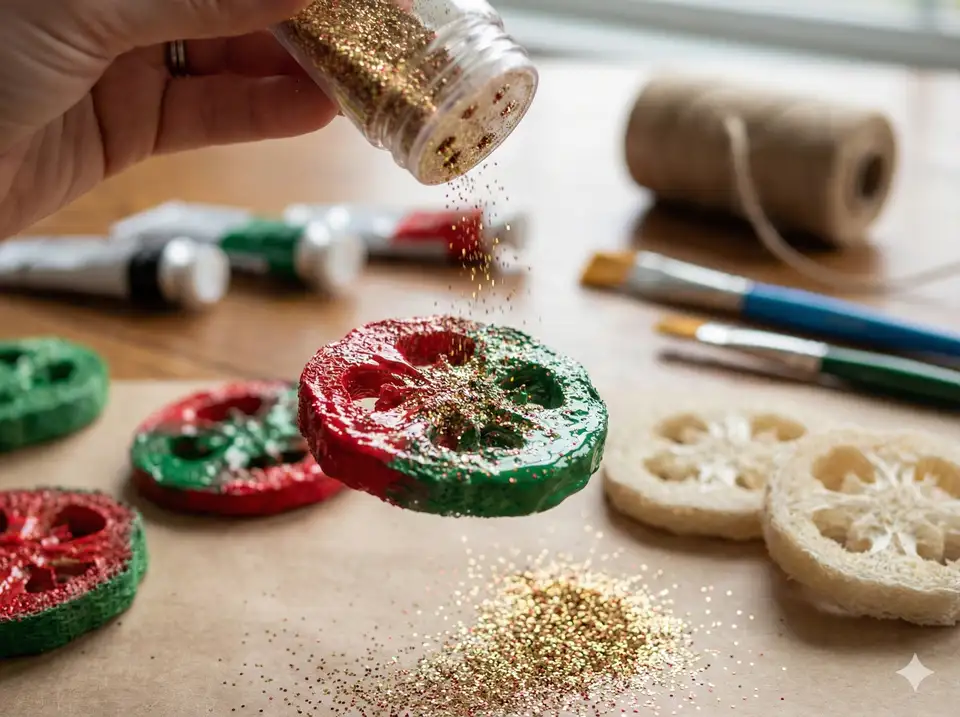
- Fine glitter in gold, silver, or iridescent colors
- Small beads and sequins for added sparkle
- Miniature bells for sound and movement
- Faux pearls or rhinestones for elegant accents
- Small pine cones, holly, or artificial berries
- Metallic markers for fine details
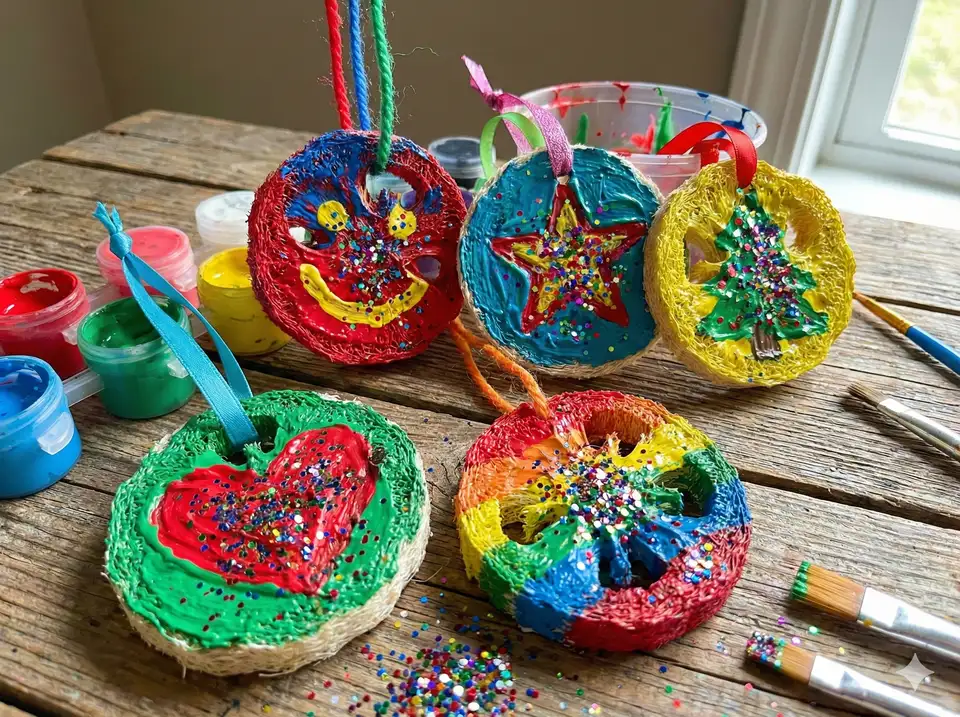
Creative Loofah Ornament Ideas and Designs
The versatility of loofah allows for countless ornament designs. These make a wonderful craft project with children for family holiday memories. Here are four popular styles that showcase different techniques and difficulty levels.
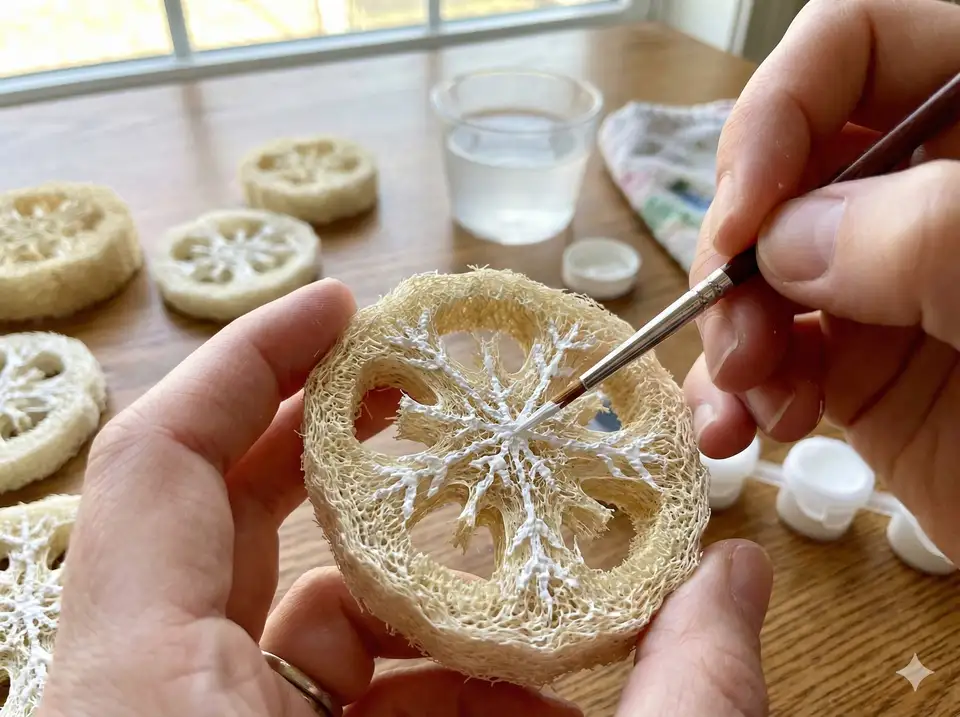
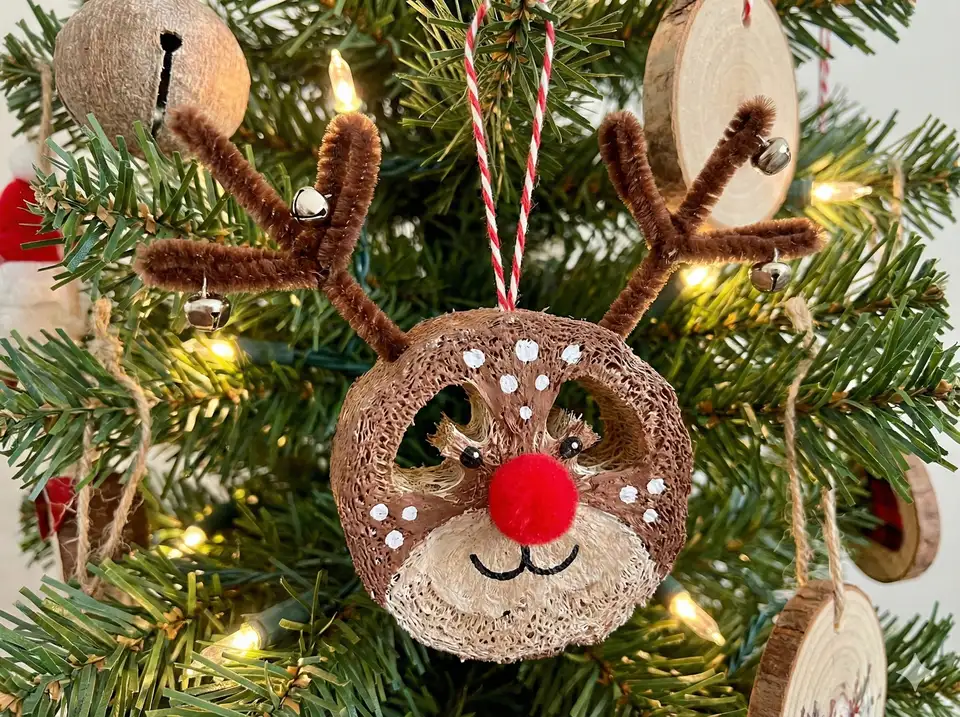
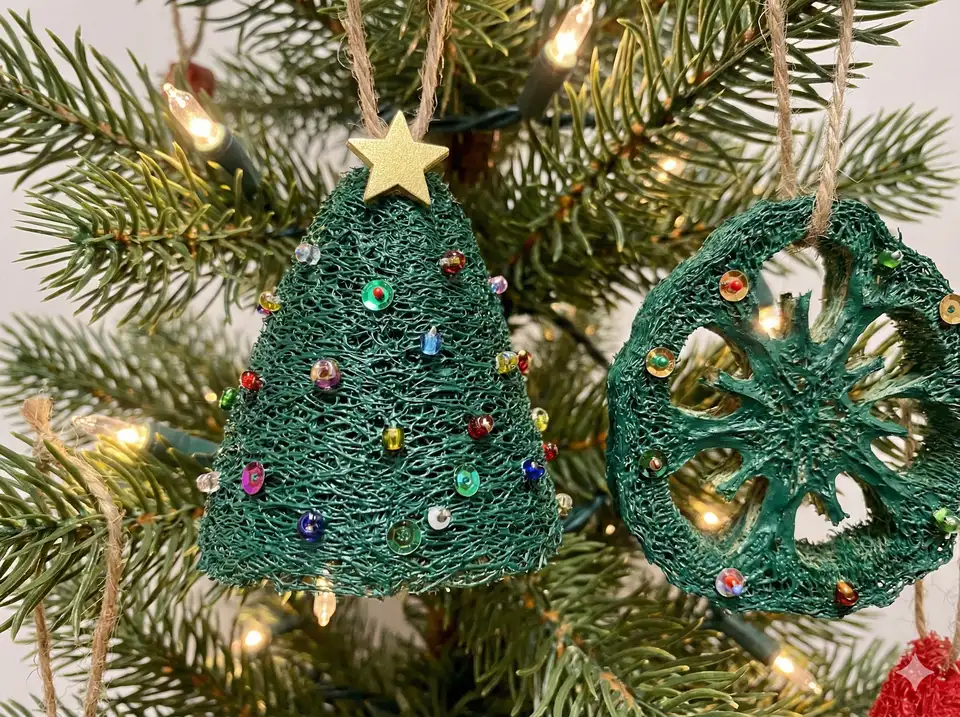
Create stunning snowflakes by cutting thin slices from loofah and trimming into 6-pointed or 8-pointed patterns. The natural fibrous structure resembles intricate ice crystals.
- Cut 1/4 to 1/2 inch thick rounds from loofah
- Trim edges into pointed snowflake shapes
- Paint white or leave natural, then add silver glitter
- Attach clear fishing line for invisible hanging
- Group multiple sizes for layered effect
Fashion adorable angels using cone-shaped loofah pieces for the body and circular slices for wings. Add a wooden bead head for a traditional look.
- Cut triangular body section from loofah
- Use thin rounds for wings on each side
- Glue wooden bead on top for head
- Paint body in white, cream, or pastel colors
- Add gold halo using metallic pipe cleaner
- Embellish with lace trim or ribbon

Five-pointed or rustic stars made from loofah make eye-catching tree toppers or large statement ornaments. Perfect for showcasing metallic paints.
- Draw star template on flat loofah section
- Carefully cut out 5-pointed star shape
- Paint with metallic gold or silver spray paint
- Add dimensional texture with puffy paint
- Glue sequins or rhinestones at points
- Attach wire loop for hanging

Miniature wreaths combine multiple loofah pieces arranged in a circle, decorated with berries, bows, and seasonal greenery for classic appeal.
- Cut small loofah chunks or thin strips
- Arrange pieces in circle on cardboard backing
- Hot glue pieces overlapping for fullness
- Paint green or leave natural tan color
- Add red berries, tiny pine cones, bow
- Attach ribbon loop at top for hanging

Step-by-Step Instructions for Natural Christmas Ornaments
Follow this comprehensive guide to create professional-looking loofah ornaments. These techniques work for all ornament styles and ensure durable, beautiful results.
Step 1: Prepare Your Loofah
Start with fully dried loofah sponges. If you're using store-bought loofah, ensure they're clean and free of soap residue. Homegrown loofahs should be completely dry with seeds removed. The loofah should feel lightweight and crispy, not damp or flexible.
Step 2: Cut Your Shapes
Using sharp scissors or a craft knife, carefully cut the loofah into your desired shapes. Work slowly to avoid crushing the delicate fibers. For circular ornaments, slice straight across the loofah to create rounds of varying thicknesses. For shaped ornaments, sketch your design lightly with pencil first.
Step 3: Apply Base Paint
Before adding decorative elements, apply a base coat of acrylic paint. This seals the loofah fibers and provides better adhesion for subsequent layers. Use a foam brush or sponge to dab paint into the porous surface, ensuring even coverage. Allow 2-3 hours to dry completely.
Step 4: Add Decorative Details
Once the base paint is dry, add your creative touches. Apply glitter by brushing a thin layer of mod podge or white glue on desired areas, then sprinkling with glitter. Attach embellishments like beads, sequins, or rhinestones using hot glue.
Step 5: Create Hanging Loops
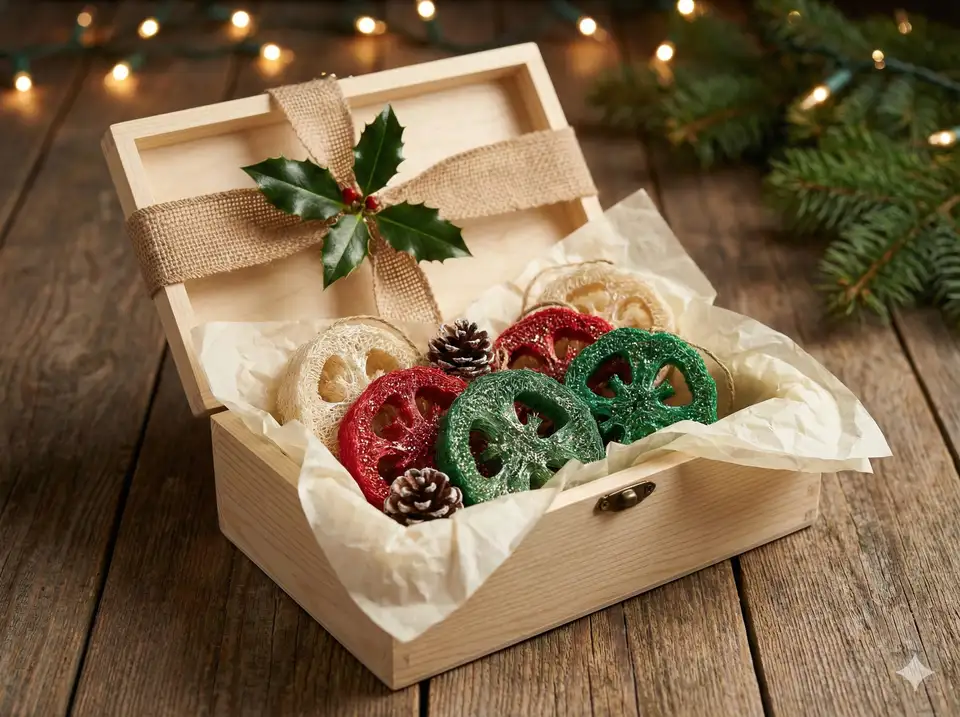
Thread ribbon, twine, or ornament hooks through the top of each ornament. For loofah with a dense structure, you may need to create a small hole with a needle or skewer first. These finished ornaments work beautifully for holiday gift assembly in decorated baskets.
Step 6: Seal and Protect
Apply a clear acrylic sealer or varnish to protect your finished ornaments. This prevents paint from chipping, secures glitter, and helps preserve the loofah from yellowing over time. Apply 2-3 light coats.
- Work in batches - cut and paint multiple ornaments at once for efficiency
- Use painter's tape to create clean stripes or geometric patterns
- Add essential oils (cinnamon, pine) to paint for scented ornaments
- Create ombre effects by blending wet paint colors together
- Save small loofah scraps for filler in mini wreath designs
- Photograph your creations to remember successful designs for next year
Painting and Decorating Tips
Achieving professional-looking results requires understanding how to work with loofah's unique texture. These techniques help you create ornaments worthy of display year after year. Consider incorporating these ornaments with other decorating with loofah projects throughout your home.

Color Selection and Combinations
Traditional Christmas colors like red, green, white, gold, and silver always work beautifully on loofah ornaments. However, don't be afraid to experiment with modern palettes like blush pink with champagne gold, navy blue with silver, or even all-white designs for minimalist elegance.
Painting Techniques for Texture
- Dry brushing: Load brush lightly with paint and stroke across the surface to highlight raised fibers
- Stippling: Dab paint vertically with a stiff brush for even texture coverage
- Ombre blending: Apply two colors while wet and blend the transition zone
- Splatter painting: Flick paint-loaded brush for random speckled effect
- Color washing: Dilute paint with water for subtle tint

Storage and Care for Homemade Loofah Ornaments
Proper storage ensures your handmade loofah ornaments remain beautiful for many holiday seasons. Natural materials require slightly different care than plastic decorations.
Post-Holiday Cleaning
Before storing ornaments, gently dust them with a soft brush or use compressed air to remove any debris. If ornaments accumulated sticky residue from tree sap, spot clean with a barely damp cloth. Allow ornaments to dry completely before packing.
Storage Best Practices
Store loofah ornaments in a cool, dry location away from direct sunlight and humidity. Wrap each ornament individually in acid-free tissue paper to prevent scratching and color transfer. Place wrapped ornaments in sturdy cardboard boxes with dividers.
- Yellowing: Store away from sunlight and seal with UV-protective varnish
- Mold/mildew: Ensure ornaments are completely dry; use silica gel packets
- Pest damage: Add cedar blocks or lavender sachets to storage boxes
- Crushed shape: Use compartmentalized storage or tissue paper nests
- Fading colors: Keep away from light; refresh paint every few years
Frequently Asked Questions
Yes! Dried loofah sponges are perfect for making eco-friendly Christmas ornaments. Their natural fibrous texture creates beautiful, lightweight decorations. You can cut dried loofah into various shapes like snowflakes, stars, and angels, then paint and decorate them with craft supplies. The porous structure accepts paint well and holds embellishments securely.
Essential supplies include dried loofah sponges, sharp scissors or craft knife, acrylic paints in holiday colors, paintbrushes of various sizes, ribbon or twine for hanging, hot glue gun with glue sticks, and clear acrylic sealer for protection. Optional decorative items include glitter, beads, sequins, bells, and metallic markers.
To preserve loofah ornaments, seal them with 2-3 coats of clear acrylic varnish or mod podge after decorating. This protects the paint and prevents yellowing. Store ornaments in a cool, dry place wrapped individually in acid-free tissue paper inside airtight containers. Add silica gel packets and cedar blocks to deter moisture and pests.
Snowflakes, stars, angels, and wreaths work exceptionally well with loofah's natural texture. Simple geometric shapes are easiest to cut and maintain structural integrity. Round slices (1/4 to 1/2 inch thick) showcase the beautiful circular fiber pattern inside the loofah. Longer pieces can be shaped into candy canes or Christmas trees.
Loofah ornaments are generally safe as they're made from natural plant fibers. However, ensure all decorative elements like beads and glitter are securely attached to prevent choking hazards. Use non-toxic, water-based paints and sealers. Keep small ornaments out of reach of young children and pets who might chew on them. For households with curious pets, hang loofah ornaments higher on the tree.
Crafting Christmas ornaments from natural loofah sponges offers a wonderful opportunity to combine creativity with environmental consciousness. Whether you're creating delicate snowflakes, elegant angels, sparkling stars, or festive wreaths, loofah provides a versatile canvas for your imagination. Start with simple designs to build your skills, then progress to more elaborate creations that become cherished family heirlooms.