
Proper preparation is the key to cooking delicious luffa gourd dishes. While luffa is incredibly forgiving and easy to work with, understanding the fundamentals of cleaning, peeling, cutting, and storing this unique vegetable will ensure the best texture and flavor in your finished dishes. Whether you're preparing luffa for a quick stir-fry, a delicate soup, or steamed side dish, these techniques will set you up for success.
This comprehensive guide covers everything from selecting young gourds at the market to the final prep steps before cooking. You'll learn professional techniques used in Asian kitchens, common mistakes to avoid, and time-saving tips that make cooking with luffa a breeze. If you're ready to start cooking, check out our complete cooking guide for recipes and techniques.
Recommended Preparation Tools
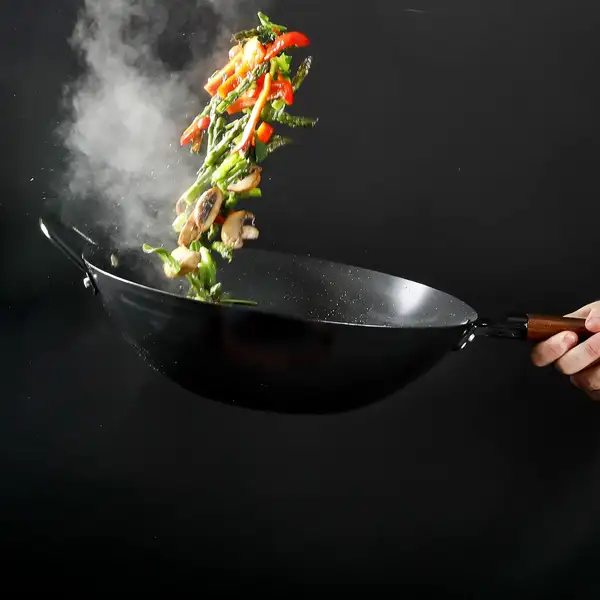
Babish Carbon Steel Flat Bottom Wok (14-Inch)
Restaurant-quality wok for authentic luffa stir-fry - works on all stovetops including induction
Check Price on AmazonAs an Amazon Associate, we earn from qualifying purchases.
How to Prepare Luffa Gourd for Cooking: Start with Selection
Before you can prepare luffa, you need to select the right specimens. The quality of your starting material makes a tremendous difference in the final dish, so it's worth taking a moment to understand what makes excellent eating luffa.
- Size matters most: Choose luffa that's 4-6 inches long for the most tender texture. Larger gourds (over 8 inches) become fibrous and tough
- Color indicates freshness: Look for bright, vibrant green with no yellowing or brown patches. Pale green or yellow indicates over-maturity
- Firmness test: Gently squeeze the gourd. It should feel firm but yield slightly to pressure, similar to a cucumber. Rock-hard luffa is too young; soft, squishy luffa is too old
- Skin condition: The ridged skin should be intact and taut, not wrinkled or shriveled. Minor fuzz or tiny prickles are normal on young luffa
- Weight check: Fresh luffa should feel heavy for its size, indicating good moisture content and tender flesh
Understanding the optimal harvest timing helps you identify the best luffa for eating. Knowing the timing for food harvest versus sponge harvest ensures you get gourds at their peak eating quality.
Selecting the Right Luffa: Young vs Mature
The age of the luffa gourd dramatically affects both preparation methods and final eating quality. Understanding these differences helps you choose and prepare luffa appropriately.
| Characteristic | Young Luffa (Best for Eating) | Mature Luffa (For Sponges) |
|---|---|---|
| Size | 4-6 inches (10-15 cm) | 10-18 inches (25-45 cm) |
| Color | Bright green, vibrant | Yellow-brown, faded |
| Texture | Tender, similar to zucchini | Fibrous, woody, inedible |
| Seeds | Small, soft, barely formed | Large, hard, fully developed |
| Skin | Thin, easy to peel | Tough, thick, difficult to remove |
| Interior | Solid, spongy flesh throughout | Hollow with fibrous network |
| Taste | Mild, slightly sweet, pleasant | Bitter, unpalatable |
| Best Use | Cooking (all methods) | Processing into bath sponges |
Luffa transitions from edible to inedible quickly, sometimes in just 3-5 days during peak growing season. Once a luffa gourd reaches about 8 inches long, the fibrous network begins forming rapidly inside. At this stage, the texture becomes unpleasant for eating. If you're growing your own, check plants every 2-3 days during harvest season to catch gourds at their peak.
How to Peel Luffa: To Peel or Not to Peel
One of the most common questions about preparing luffa is whether you need to peel it. The answer depends on the variety, age, and your personal preference. Understanding edible loofah basics helps you make the right choice.
When to Peel Luffa
The ridged variety (Luffa acutangula) has tough, angular ridges running lengthwise that remain fibrous even when cooked. Always peel ridged luffa completely:
- Use a sharp vegetable peeler or paring knife
- Remove all ridges and green skin until you reach the pale green or white flesh
- The peeled flesh should be smooth and uniform in color
- Don't worry about removing too much—you want to eliminate all tough skin
Smooth luffa (Luffa aegyptiaca) has thinner, more tender skin that's often edible when young:
- Very young (3-4 inches): Skin is completely tender; no peeling needed
- Young (4-6 inches): Lightly peel just to remove any tough outer layer
- Medium (6-8 inches): Peel completely as skin becomes tougher
- Taste test: If you're unsure, cut a small piece and taste the skin raw
Step-by-Step Peeling Technique
Proper peeling technique ensures you remove tough skin while preserving as much tender flesh as possible:
- Wash thoroughly: Rinse the luffa under cold running water, gently rubbing to remove any dirt or fine fuzz. Pat dry with a clean kitchen towel.
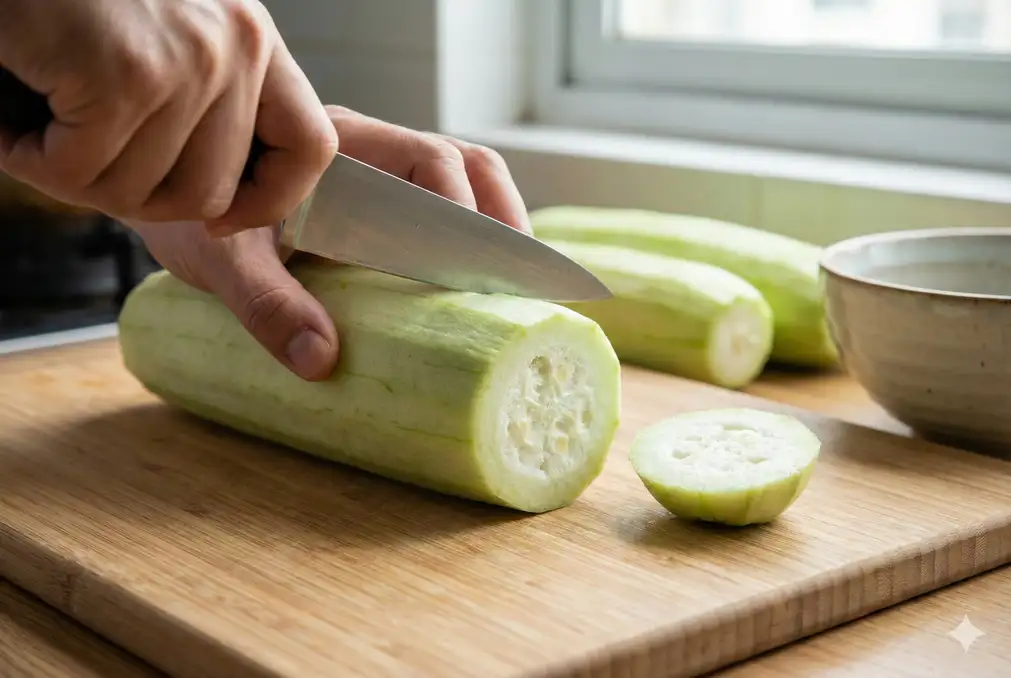
- Trim the ends: Cut off about 1/4 inch from both the stem and blossom ends. These areas are typically tougher and less pleasant to eat.
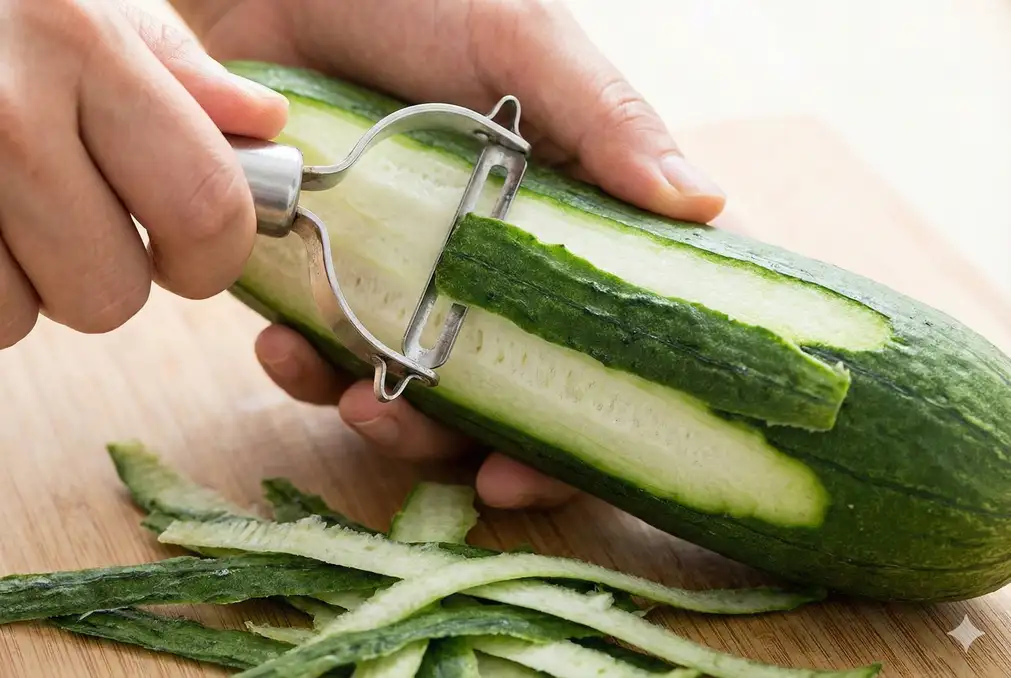
- Choose your tool: A sharp vegetable peeler works best for smooth, quick peeling. For very ridged luffa, a small paring knife gives you more control.
- Peel in strips: Working from top to bottom, peel away the skin in long strips. For ridged luffa, angle your peeler to get under the ridges completely.
- Check your work: The peeled luffa should be pale green or white with a smooth surface. If you see any dark green patches or tough-looking areas, peel them away.
- Rinse again: Give the peeled luffa a quick rinse to remove any clinging skin fragments.
- Keep it moist: If you're peeling multiple luffa, keep unpeeled ones in cold water to maintain freshness
- Minimize waste: Use a Y-shaped peeler for thinner peels that preserve more flesh
- Save the skin: Luffa skin can be composted or fed to chickens—it's rich in fiber
- Practice makes perfect: Your first luffa might take 5 minutes to peel; soon you'll do it in under a minute
Cutting Techniques for Luffa
How you cut your luffa affects both cooking time and the final texture of your dish. Different cutting styles suit different cooking methods and recipes. Once properly cut, your prepared luffa for stir fry will cook evenly and absorb flavors beautifully.
Common Cutting Styles
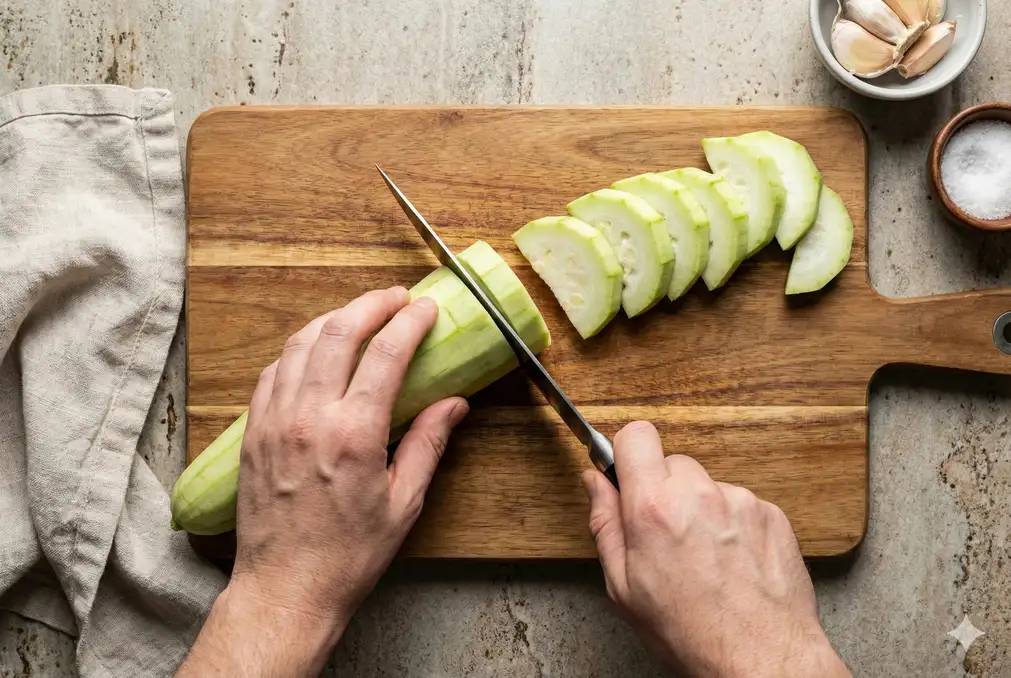
Cut the peeled luffa at a 45-degree angle into 1/2-inch thick slices. This is the most common preparation in Chinese cooking:
- Creates attractive, elongated pieces
- Increases surface area for better browning and flavor absorption
- Cooks quickly and evenly in 3-5 minutes
- Perfect for stir-fries with garlic, ginger, and meat or seafood
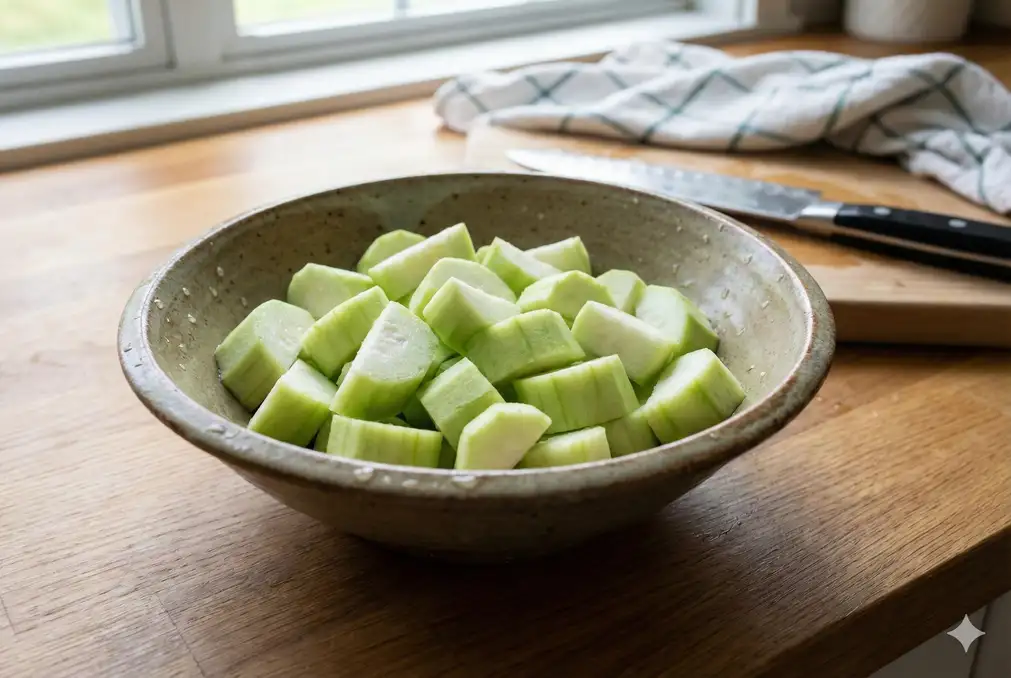
Cut the luffa into 1-inch pieces (either straight across or into cubes):
- Hearty, substantial pieces that hold their shape during long cooking
- Ideal for soups, curries, and braised dishes
- Takes 8-10 minutes to cook until tender
- Absorbs broth flavors beautifully
Cut luffa into thin, uniform strips about 2 inches long and 1/4 inch thick:
- Cooks extremely fast (1-2 minutes)
- Great for light, delicate dishes
- Can be eaten raw in salads when very young and tender
- Popular in Vietnamese and Thai cooking
Cut luffa lengthwise into halves or quarters, then into 2-3 inch segments:
- Creates boat-shaped pieces perfect for stuffing with meat or seafood
- Large surface area ideal for grilling or roasting
- Scoop out seeds to create a hollow for stuffing
- Takes 10-12 minutes to cook thoroughly
- Sharp knife is essential: A dull knife crushes the tender luffa flesh instead of cutting cleanly
- Uniform size matters: Cut pieces to the same size for even cooking
- Don't over-process: Luffa is delicate; rough handling can make it mushy
- Cut right before cooking: Pre-cut luffa oxidizes and browns quickly; prep just before use
- Match cut to cooking time: Smaller pieces for quick stir-fries, larger chunks for slow-cooked dishes
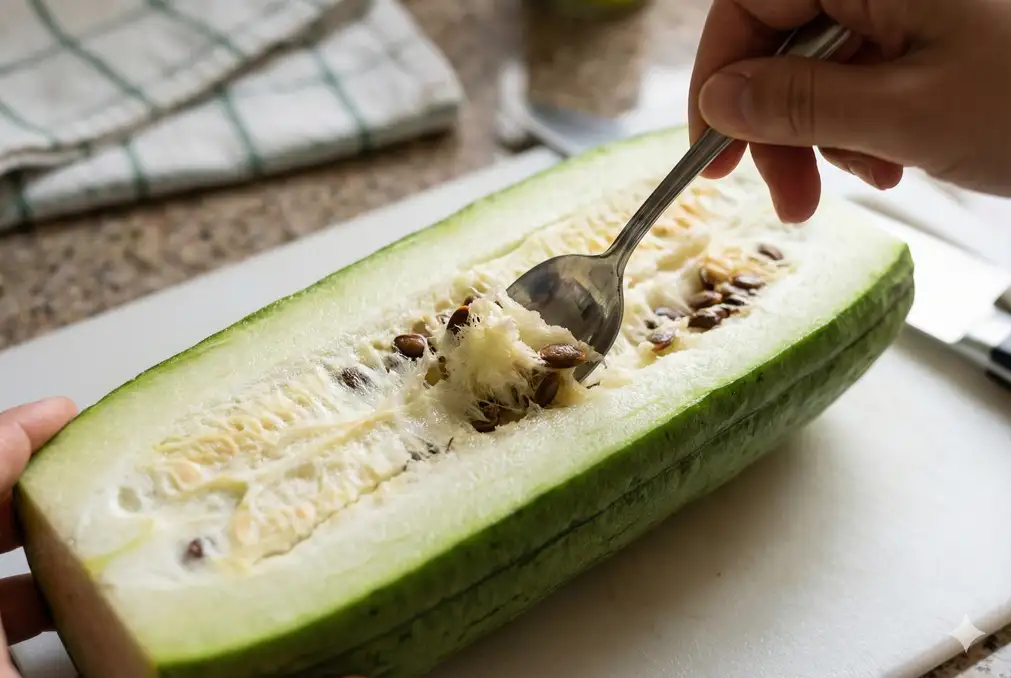
Removing Seeds from Luffa
Whether you need to remove seeds depends entirely on the age and size of your luffa. Very young luffa has virtually no seeds, while larger gourds develop noticeable seeds that some cooks prefer to remove.
When to Remove Seeds
- 4-5 inches long: No seed removal needed. Seeds are tiny, soft, and completely edible
- 6-7 inches long: Seeds are forming but still tender. Optional removal based on preference
- 8+ inches long: Seeds are larger and more noticeable. Consider removing for better texture
- Cooking method matters: Seeds become less noticeable in soups and stews but more apparent in stir-fries
- Personal preference: Some people don't mind the seeds at all, while others prefer seedless luffa
How to Remove Seeds
If you decide to remove seeds, here's the easiest method:
- Cut lengthwise: After peeling, cut the luffa in half lengthwise from end to end.
- Identify seed cavity: You'll see a central channel running down the middle where seeds develop. In young luffa, this is barely visible; in larger luffa, it's more pronounced.
- Scoop out seeds: Use a small spoon or your thumb to gently scoop out the seeds and any soft, pithy material around them.
- Rinse quickly: Give the halves a quick rinse under cold water to remove any remaining seeds.
- Cut as desired: Proceed to cut the seedless halves into your preferred shape.

- If you're growing luffa, save the larger seeds from the biggest, healthiest gourds
- Rinse seeds, dry thoroughly, and store in a paper envelope in a cool, dry place
- Seeds remain viable for 3-5 years with proper storage
- Each luffa contains 20-40 seeds—more than enough for next year's crop
How to Prevent Luffa from Turning Brown
One of the most common challenges when preparing luffa is oxidation—the flesh turns brown when exposed to air, similar to apples or avocados. While this browning doesn't affect food safety or significantly impact flavor, it does make your dish less visually appealing. This is especially important when preserving the delicate flavor of fresh luffa.
Why Luffa Turns Brown
Luffa contains enzymes called polyphenol oxidases that react with oxygen when cells are cut or damaged. This enzymatic browning is completely natural and harmless, but it can make your carefully prepared luffa look unappetizing within 10-15 minutes of cutting.
Proven Methods to Prevent Browning
Immediately after cutting, submerge luffa pieces in cold water with an acid:
- Ratio: 1 tablespoon lemon juice or white vinegar per 2 cups cold water
- Duration: Keeps luffa fresh and white for up to 2 hours
- Rinse before cooking: Give a quick rinse to remove excess acid
- Why it works: Acid denatures the enzymes responsible for browning
A salt brine helps prevent browning and adds subtle seasoning:
- Ratio: 1 teaspoon salt per 2 cups cold water
- Duration: Effective for 30-60 minutes
- Bonus: The salt slightly seasons the luffa from within
- No rinse needed: Just drain and pat dry before cooking
Brief blanching deactivates enzymes and preserves color:
- Method: Drop cut luffa into boiling water for 30 seconds, then into ice water
- Result: Locks in bright color for several hours
- Advantage: Pre-blanched luffa cooks faster in final dish
- Storage: Refrigerate in airtight container for up to 24 hours
The easiest method is simply limiting oxygen exposure:
- Cut just before cooking: Minimize time between prep and cooking
- Cover with damp towel: Keep cut pieces under a moist paper towel
- Work in batches: Peel and cut luffa in small amounts as needed
- Cook immediately: Best practice is prep → cook within 5 minutes
While water soaks prevent browning, extended soaking (over 2 hours) can make luffa waterlogged and dilute its delicate flavor. For best results, soak only as long as necessary and drain well before cooking. Pat dry with paper towels if you notice excess moisture.
Storing Prepared Luffa
Sometimes you need to prepare luffa ahead of time for meal prep or entertaining. Here's how to store it properly while maintaining quality.
Short-Term Storage (Same Day)
For preparation a few hours before cooking:
- In acidulated water: Keep cut luffa submerged in lemon water in the refrigerator for up to 2 hours
- In airtight container: Place cut, dry luffa in an airtight container with a damp paper towel for up to 4 hours
- Wrapped tightly: Wrap peeled whole luffa in plastic wrap and refrigerate for up to 6 hours
Longer Storage (1-2 Days)
If you must prepare luffa more than a day in advance:
- Blanch the cut luffa pieces in boiling water for 30 seconds
- Shock immediately in ice water to stop cooking
- Drain thoroughly and pat completely dry
- Store in an airtight container with paper towels to absorb moisture
- Refrigerate for up to 2 days
- Reduce final cooking time by 2-3 minutes since luffa is partially cooked
Storing Whole, Unprepared Luffa
Fresh, whole luffa keeps much better than prepared luffa:
- Room temperature: 2-3 days in a cool, dry place away from direct sunlight
- Refrigerator (unwashed): 5-7 days in the crisper drawer, unwashed and unwrapped
- Refrigerator (wrapped): Up to 10 days wrapped loosely in paper towels inside a plastic bag with holes for air circulation
- Yes, but: Luffa can be frozen, but the texture becomes much softer and more watery after thawing
- Best method: Blanch 1-2 minutes, cool, drain thoroughly, freeze in portions
- Storage time: Up to 3 months in freezer-safe bags or containers
- Best uses for frozen: Soups, stews, and braised dishes where soft texture is acceptable
- Not recommended for: Stir-fries or dishes where crisp-tender texture is important
Essential Tools for Preparing Luffa
Having the right tools makes preparing luffa faster, easier, and safer. Here are the essential implements every luffa cook should have.
- Sharp vegetable peeler: Y-shaped swivel peelers work best for luffa's curved surface
- Paring knife: Essential for trimming ends and peeling ridged varieties
- Sharp chef's knife: For clean, precise cuts that don't crush the flesh
- Cutting board: Use a stable surface; wood or plastic both work well
- Small spoon: For scooping seeds from larger luffa
- Bowl of cold water: For soaking cut pieces to prevent browning
Common Mistakes to Avoid When Preparing Luffa
Learn from these common preparation errors to ensure perfect results every time:
- Using over-mature luffa: Once luffa exceeds 8 inches or starts yellowing, it's too old for eating. The texture will be fibrous and bitter no matter how you prepare it.
- Incomplete peeling: Leaving ridges or tough skin makes the final dish unpleasant. Always peel until you reach uniformly pale, smooth flesh.
- Dull knife: A dull knife crushes luffa's delicate structure, causing mushiness and excessive water release during cooking.
- Cutting too far in advance: Luffa oxidizes quickly. Cut no more than 30 minutes before cooking unless using an anti-browning method.
- Uneven pieces: Irregular sizes cook unevenly, with small pieces becoming mushy while large pieces remain undercooked.
- Over-soaking: Leaving luffa in water for hours waterlogs the flesh and dilutes flavor.
- Skipping the rinse: Always rinse luffa after peeling to remove skin fragments and surface enzymes that cause browning.
Frequently Asked Questions About Preparing Luffa
For ridged luffa (angled luffa), always peel completely—the ridges remain tough even after cooking. For smooth luffa, peeling depends on size: very young gourds (under 4 inches) don't need peeling, while larger ones should be peeled for better texture. When in doubt, peel it. The peeled flesh cooks more evenly and has a much better mouthfeel.
The most effective method is soaking cut luffa in cold water with 1 tablespoon of lemon juice or vinegar per 2 cups water. This acidulated water prevents oxidation for up to 2 hours. Alternatively, cut luffa just before cooking, or briefly blanch it in boiling water for 30 seconds, then shock in ice water to lock in the bright color.
Yes, luffa seeds from young gourds are completely edible and tender. In very small luffa (4-5 inches), the seeds are barely formed and unnoticeable when cooked. As luffa grows larger, seeds become more pronounced but remain edible. Some people prefer to scoop them out for aesthetic reasons, but it's not necessary for food safety or taste in young luffa.
For best quality, prepare luffa immediately before cooking. If you must prep in advance, peeled whole luffa can be wrapped and refrigerated for up to 6 hours. Cut luffa should be submerged in acidulated water and refrigerated for no more than 2 hours. For longer storage (up to 2 days), blanch the cut pieces, dry thoroughly, and store in an airtight container in the refrigerator.
For stir-fries, diagonal slices work best. Cut the peeled luffa at a 45-degree angle into 1/2-inch thick pieces. This traditional Chinese cutting method creates attractive oval pieces with maximum surface area for browning and flavor absorption. The angled cuts also cook quickly and evenly in a hot wok or skillet, taking just 3-5 minutes.
Luffa is too mature for eating if it's over 8-10 inches long, has yellowing or brown skin, feels very firm and heavy, or sounds hollow when tapped. When you cut it open, over-mature luffa shows a fibrous, net-like structure inside instead of solid, spongy flesh. The taste will be bitter and the texture woody. For best eating quality, choose luffa that's 4-6 inches long with bright green skin.
Yes, but freezing significantly changes luffa's texture, making it much softer and more watery. If you must freeze, blanch cut luffa for 1-2 minutes, cool in ice water, drain thoroughly, and freeze in portions for up to 3 months. Use frozen luffa only in soups, stews, or braised dishes where soft texture is acceptable. It's not suitable for stir-fries or dishes requiring crisp-tender texture.
No special tools are required, but a sharp vegetable peeler and a good chef's knife make the job much easier. A Y-shaped swivel peeler works best for the curved surface of luffa. For very ridged varieties, a small paring knife gives you better control for removing all the tough ridges. The most important factor is sharpness—dull blades crush the delicate luffa instead of cutting cleanly.