
There's something deeply satisfying about stepping into the shower with a handmade loofah soap bar. These ingenious creations embed slices of natural loofah sponge directly into soap, creating an all-in-one exfoliating cleanser that looks beautiful on any bathroom shelf. If you've grown your own loofahs or purchased natural ones, turning them into embedded soap bars is one of the most rewarding DIY projects you can undertake.
The concept is elegantly simple: natural loofah slices are suspended within clear or lightly colored soap, creating a functional art piece that exfoliates while it cleanses. As the soap diminishes with use, fresh loofah texture is continuously revealed, meaning you get consistent exfoliation from the first wash to the last. These make exceptional gifts because they're both practical and visually striking, with the intricate loofah fiber patterns visible through the translucent soap.
This comprehensive guide walks you through everything you need to know, from selecting the right loofah to mastering both beginner-friendly melt-and-pour methods and more advanced cold-process techniques. Whether you're crafting for personal use or preparing homemade gifts, you'll find detailed instructions that ensure success.
Why Make Loofah Soap Bars?
Loofah soap bars offer advantages that neither standalone loofahs nor regular soaps can provide. When you use a separate loofah sponge and bar of soap, you're constantly juggling two items, and the loofah requires separate storage and drying between uses. An embedded loofah soap solves this elegantly: the loofah stays attached to the soap, getting rinsed and naturally drying with it.
From a sustainability standpoint, these bars are a dream. Both components are completely natural and biodegradable. When the soap is finished and the loofah is worn out, you can toss the remains directly into your compost bin. There's no plastic packaging, no synthetic materials, and no waste. For anyone building a plastic-free bathroom, loofah soap bars are an essential addition.
The exfoliation benefits are particularly noteworthy. Commercial body washes with plastic microbeads have been banned in many countries due to environmental concerns. Loofah soap bars provide built-in exfoliation without contributing to microplastic pollution. The fibrous texture of natural loofah is ideal for removing dead skin cells, stimulating circulation, and helping your skin better absorb the moisturizing ingredients in your soap. They fit perfectly into any plastic-free shower products routine.
Loofah soap bars make impressive gifts because they look professionally made even when homemade. Package them in kraft paper with a simple ribbon for an eco-friendly presentation that showcases the beautiful loofah patterns.
Materials You'll Need
Before diving into the soap-making process, gather all your materials. Having everything ready prevents rushed decisions while your soap base is melting or cooling. The specific supplies vary depending on whether you choose melt-and-pour or cold-process methods, but the loofah preparation is the same for both.
Essential Loofah Preparation Supplies
Start with high-quality natural loofah. If you've grown your own loofahs, you'll have complete control over the quality. Be sure to prepare loofah for soap making properly—homegrown loofahs that have been correctly processed typically have brighter, cleaner fibers than many commercial options. If you prefer not to DIY, there are ready-made options to buy as well. Whether homegrown or purchased, look for loofahs with an even, open fiber structure and no musty smell.
You'll need a sharp serrated knife or bread knife for cutting clean loofah slices. A regular kitchen knife tends to crush the fibers rather than cutting cleanly through them. Cut your loofah into rounds approximately 3/4 to 1 inch thick. Thinner slices may fall apart when the soap is used, while thicker slices take longer to thoroughly saturate with soap.
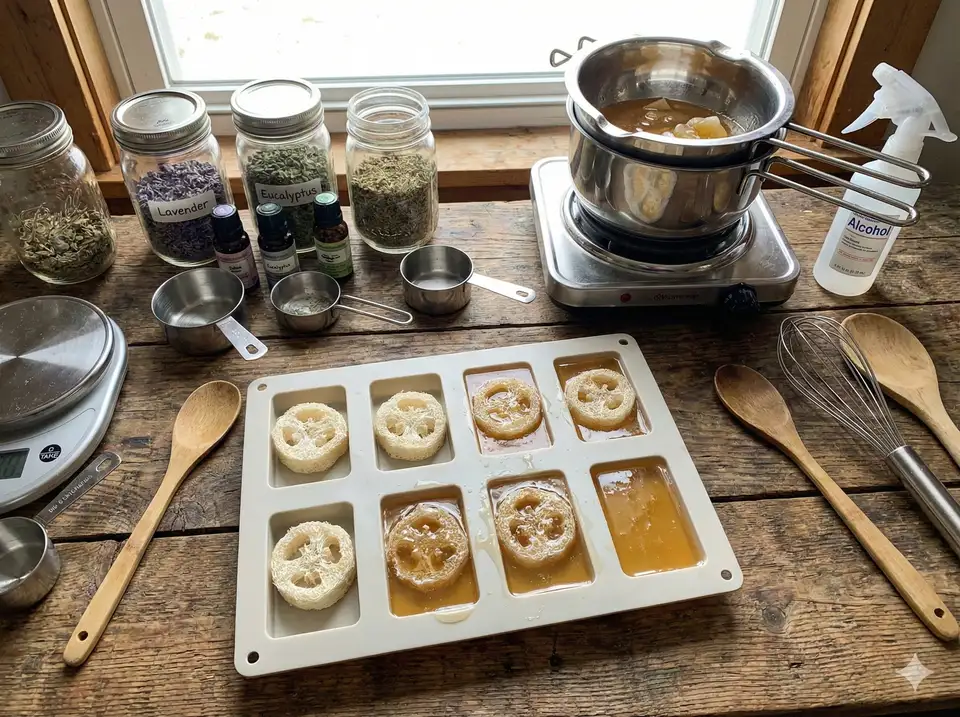
Melt-and-Pour Supplies
For beginners, the melt-and-pour method is ideal. You'll need:
- Melt-and-pour soap base (2-4 oz per loofah slice) - clear glycerin shows off the loofah pattern beautifully, while goat's milk or shea butter bases create a more opaque, luxurious look
- Silicone soap molds - slightly larger in diameter than your loofah slices, with straight sides
- Heat-safe container for melting (a glass measuring cup works well)
- Fragrance oils (optional) - specifically designed for soap making
- Colorants (optional) - soap-safe dyes or micas
Many crafters prefer a combination approach: a thin layer of colored base on the bottom, topped with clear soap to showcase the loofah. Round molds work best, though square molds create a modern aesthetic.

Preparing Your Loofah for Soap Making
Proper loofah preparation is the foundation of successful soap making. A well-prepared loofah will bond properly with the soap, maintain its structure during use, and provide the right level of exfoliation. Rushing this step often results in soaps where the loofah detaches or doesn't fully integrate with the soap base.
Begin by inspecting your loofah for any remaining seeds, skin fragments, or debris. Even processed loofahs sometimes retain small bits that should be removed. Shake the loofah vigorously over a trash bin and use a stiff brush if needed to dislodge any particles caught in the fibers.
Softening and Cleaning
Soak your loofah in warm water for 30-60 minutes before cutting. This softens the fibers, making them easier to cut cleanly and helping them absorb the soap base when you pour it. Some crafters add a tablespoon of white vinegar to the soaking water to brighten fibers and eliminate any residual bacteria.
After soaking, squeeze out excess water thoroughly—the loofah should be damp but not dripping. Lay the rounds flat on a clean towel and press gently to remove surface moisture. If you're not using them immediately, let them air dry completely. Bone-dry loofah slices actually work better than slightly damp ones for soap making because they absorb the liquid soap base more readily.
Never use a loofah that smells musty or shows signs of mold. Contaminated loofahs can harbor bacteria that won't be eliminated by the soap-making process. Start with fresh, properly dried loofahs only.
Melt-and-Pour Method (Beginner-Friendly)
The melt-and-pour technique is perfect for beginners because it requires no specialized equipment or safety precautions beyond basic kitchen safety. There's no lye to handle, no lengthy curing time, and the results are immediately rewarding. You can go from raw materials to finished soap in under an hour.
Step-by-Step Instructions
- Position your loofah slices - Place them into the silicone molds, sitting flat against the bottom. If your slice is slightly smaller than the mold, that's ideal—you want a rim of soap surrounding the loofah.
- Cut and melt your soap base - Cut into roughly 1-inch cubes for even melting. Heat in a microwave-safe glass container in 30-second intervals, stirring between each. Most soap bases melt completely between 130-150°F (54-65°C). Avoid overheating, which can cause rubbery texture.
- Add fragrance and color (optional) - When the soap has cooled slightly to around 135°F (57°C), add fragrance oils (approximately 0.3 oz per pound of soap) and colorants. Stir gently to incorporate without creating bubbles.
- Pour the soap - Pour slowly over the loofah slice. Start with a thin layer and let it set for a few seconds to anchor the loofah. Then continue pouring until completely covered, leaving about 1/8 inch at the top.
- Let cure - Allow to set undisturbed for 24 hours before unmolding.
Troubleshooting Common Issues
If air bubbles form on the surface, lightly spray with rubbing alcohol immediately after pouring. The alcohol breaks the surface tension and causes bubbles to pop. If your loofah floats to the top of the melted soap, it means it wasn't dry enough. Try pressing it down gently with a spoon or chopstick and holding for a few seconds until the soap begins to set.
For layers or colors, let each layer set for about 5 minutes before pouring the next. Spray the surface with rubbing alcohol before adding a new layer to help the layers bond together. For more advanced techniques, our guide on soap making with embedded loofah covers additional methods.
Cold-Process Method (Advanced)
Cold-process soap making gives you complete control over ingredients and creates a harder, longer-lasting bar. However, it involves handling lye (sodium hydroxide), which requires safety precautions and proper technique. Only attempt this method if you're comfortable working with caustic materials and have proper ventilation and safety equipment.
The advantage of cold-process soap is that you can customize every ingredient—choosing specific oils for their skin-loving properties, controlling the lye ratio for mildness, and creating truly unique formulations. Cold-process soaps also tend to last longer in the shower than melt-and-pour soaps because of their denser structure.
Safety First
When handling lye, always follow these safety precautions:
- Wear safety goggles, long sleeves, and rubber gloves
- Work in a well-ventilated area or outdoors
- Never add water to lye—always add lye to water
- Avoid breathing directly over the container (the reaction creates fumes)
- Keep children and pets away from your workspace
Basic Cold-Process Recipe
A simple beginner recipe:
- 10 oz olive oil
- 5 oz coconut oil
- 5 oz palm oil (or sustainable substitute)
- 7.5 oz distilled water
- 2.9 oz lye (sodium hydroxide)
Combine your oils and heat gently until the solid oils melt. In a separate container, slowly add lye to water while stirring. Let both mixtures cool to approximately 100-110°F (38-43°C).
Carefully pour the lye water into the oils and use an immersion blender to bring the mixture to "trace"—the point where the soap thickens enough that a drizzle on the surface leaves a visible trail before sinking back. This typically takes 2-5 minutes of blending.
Place your loofah slices in molds, then pour the traced soap over them. Unlike melt-and-pour, the loofah will likely stay submerged because the soap is thicker. Cover the molds with cardboard and wrap in towels to insulate. After 24 hours, unmold and let cure for 4-6 weeks in a cool, dry place with good air circulation.
Creative Variations and Ideas
Once you've mastered the basic technique, experiment with these creative variations that elevate your loofah soaps from simple to spectacular.
Layered Designs
Create visual depth by pouring a thin layer of opaque colored soap on the bottom, positioning the loofah, then filling with clear soap. The colored layer becomes a beautiful background that highlights the loofah's texture. Popular combinations include seafoam green with mint fragrance for a spa feel, or warm amber with citrus oils for an energizing morning bar.
Botanical Additions
Embed dried botanicals alongside or within the loofah for added visual appeal and skin benefits. Dried lavender buds, rose petals, calendula flowers, or citrus zest all work beautifully. Place them on top of the loofah before pouring the soap, or sprinkle on top of the freshly poured soap while it's still liquid.
Specialty Soap Bases
Experiment with different soap bases for various skin needs. Charcoal soap base with loofah creates an excellent detoxifying bar for oily skin. Oatmeal soap bases add extra soothing properties for sensitive skin. African black soap base pairs wonderfully with loofah for a deeply cleansing experience.

Storage and Shelf Life
Proper storage ensures your loofah soap bars maintain their quality and fragrance until they're used. Melt-and-pour soaps are particularly sensitive to humidity because glycerin is hygroscopic—it attracts moisture from the air.
Wrap finished bars tightly in plastic wrap, then store in a cool, dry place away from direct sunlight. For gifting, shrink wrap provides excellent protection and a professional appearance. Unwrapped soaps can develop "glycerin dew"—small beads of moisture on the surface that are harmless but unattractive.
Well-stored melt-and-pour soaps last 1-2 years. Cold-process soaps actually improve with age as they continue to cure, and can last 3+ years when properly stored. In the shower, always place your loofah soap on a draining soap dish to prevent it from sitting in water, which causes both the soap and loofah to break down prematurely.
Tips for Using Your Loofah Soap
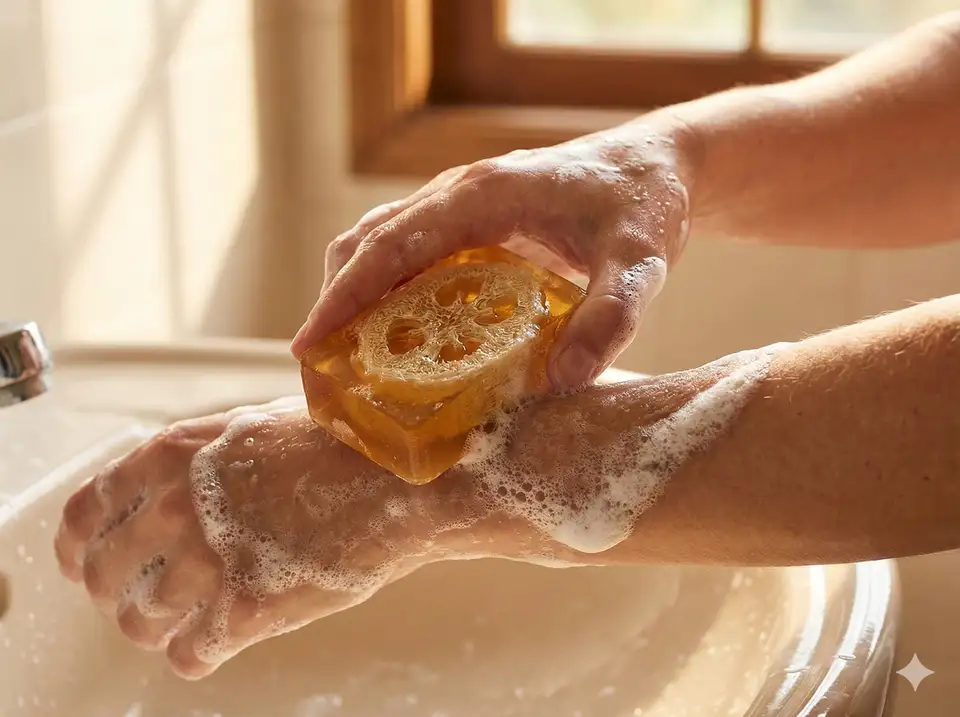
To get the most from your handcrafted loofah soap bars, use them correctly from day one. Wet the bar thoroughly before use—the loofah portion works best when fully saturated. Work up a lather on the soap portion, then use the loofah side for gentle exfoliation. The soap will gradually wear away to reveal more of the loofah as you use it.

For best results, exfoliate 2-3 times per week rather than daily. This aligns with dermatologist recommendations for most skin types and matches the guidance in our exfoliation guide. After use, store the bar soap-side down on a draining dish so the loofah portion can dry properly between uses.
Packaging for Gifts
Loofah soap bars make exceptional gifts for nearly any occasion. Their visual appeal makes them look expensive and boutique-quality, even when homemade. Package them thoughtfully to enhance the presentation.
Simple eco-friendly packaging works beautifully: wrap in natural kraft paper with a fiber ribbon, or use small organza bags that let the bar show through. For a more polished look, clear cellophane bags with handwritten labels or printed tags strike the right balance between professional and personal. Include a small card explaining what loofah is and how to use the soap for recipients unfamiliar with these unique bars. Check out our homemade gift ideas for more packaging inspiration.

Create themed gift sets by pairing loofah soap bars with complementary items: a natural bristle body brush, a bamboo soap dish, or a coordinating body butter. These combinations make thoughtful housewarming gifts, birthday presents, or holiday treats that friends and family will genuinely use and appreciate. For more ideas on sustainable gift giving, explore our complete guide.
Recommended Products
Almooni Egyptian Loofah Bath Sponges (3-Pack)
Premium thick-fiber natural loofahs - gentle exfoliation for all skin types - lasts 3-4 weeks each
Buy on Amazon
Natural Loofah Exfoliating Sponges (4-Pack)
100% organic biodegradable bath sponges - plastic-free alternative that's gentle on skin and planet
Buy on AmazonAs an Amazon Associate, we earn from qualifying purchases.